Creating a styled Gradient Button Bar: Difference between revisions
initial Edit |
Category |
||
| Line 1: | Line 1: | ||
{{WarningBox|text=Please be patient and hold your edits. I am working on this: [[User:Simow|Simow]] ([[User talk:Simow|talk]]) 22:16, 25 March 2015 (UTC)}} | {{WarningBox|text=Please be patient and hold your edits. I am working on this: [[User:Simow|Simow]] ([[User talk:Simow|talk]]) 22:16, 25 March 2015 (UTC)}} | ||
[[Category:HowTo]] | |||
== Introduction == | == Introduction == | ||
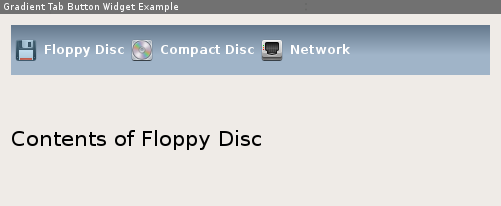
Sometimes when you are just bored by the default {{DocLink|QTabWidget}} and don't want to pull QML dependencies into your project to create a fancy user interface this article might be for you. With the help of {{DocLink|QStyle}}, {{DocLink|QBrush}}, a left-to-right {{DocLink|QListWidget}} we are creating a stylish tab bar that can switch through a {{DocLink|QStackedLayout}} that looks like this (only an example, everything customizable): | Sometimes when you are just bored by the default {{DocLink|QTabWidget}} and don't want to pull QML dependencies into your project to create a fancy user interface this article might be for you. With the help of {{DocLink|QStyle}}, {{DocLink|QBrush}}, a left-to-right {{DocLink|QListWidget}} we are creating a stylish tab bar that can switch through a {{DocLink|QStackedLayout}} that looks like this (only an example, everything customizable): | ||
Revision as of 22:19, 25 March 2015
| Please be patient and hold your edits. I am working on this: Simow (talk) 22:16, 25 March 2015 (UTC) |
Introduction
Sometimes when you are just bored by the default QTabWidget and don't want to pull QML dependencies into your project to create a fancy user interface this article might be for you. With the help of QStyle, QBrush, a left-to-right QListWidget we are creating a stylish tab bar that can switch through a QStackedLayout that looks like this (only an example, everything customizable):

What you learn
This tutorial makes use of different features and techniques provided by Qt:
- Resource System The icons you see in the screenshot are loaded via the Qt Resource System
- QBrush For creating the gradient we make use of QLinearGradient that is assigned to a QBrush.
- QPalette Qt has no direct way for setting colors to particular widgets, except using stylesheets, but as far as I know there is no support for gradients yet. So we need to make use of color roles and a customized QPalette
- QListWidget We make use of the flow property to make the items flow horizontally.